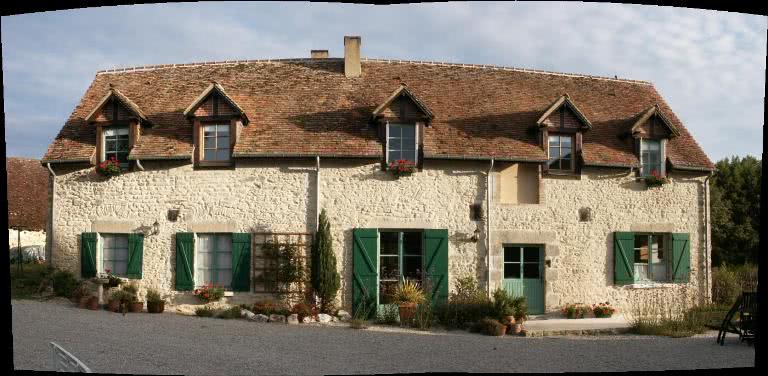
La Basse Cour: B&B near Alencon, Normandy
Masonry Restoration - Why Lime Mortar?
House Restoration and Stonework in France, Lake (Etang) Restoration

If you find this information useful, please "Like" our Facebook Page and feel free to contact us there rather than using the enquiry form on this website. We'll also be happy to share our experiences if you come to stay. | |

Further down you'lll find information on:
2. Rejointing Stonework, Lime Mortar Mix and Technique
3. Lake (Etang) Restoration
1. Converting our Loft Space (Grenier) at La Basse Cour
When we bought La Basse Cour in 2004, there were two bedrooms upstairs but no bathroom; half of the upstairs was a bare grenier (loft space).
In order to make the house suitable for our plans, we had to completely gut the upstairs and start from scratch.
This is what the house looked like, front and rear, when we first saw it in March 2004; we moved in on 1st August 2004.


Sortly after moving in, we hired an architect who drew up plans and obtained quotes for the work from a number of local companies - we needed a mason, a roofer/carpenter, an electrician, a plumber and a joiner. Building permission came through at the end of December.
Work began in February 2005 when five holes to take new dormer windows were pierced in the roof - just in time for an unexpected late blizzard in the first week of March.


Despite this unexpected cold snap, which actually froze the sand and stopped the mason from working for a week, work continued for the most part on schedule. The timber frames were constructed for the five new lucarnes (dormer windows) which were designed to match the three existing first floor windows.


Work had to be carefully co-ordinated so that no-one was delayed by having to wait for someone else to complete part of their work; the architect drew up a detailed schedule of works from start to finish, in consultation with us and the tradesmen. Weekly meetings were held to record progress and plan the work for the next week.

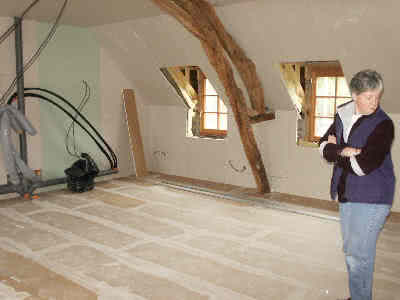
By the end of April the major building works - windows, walling, roofing, plumbing and electrical installations - were finished; all that remained was to paint, paint, lay flooring, skirting, tiling, paint, paint and install banister rails. Plus more painting. About 80 litres of paint in all. We now hate French acrylic paint.


We had 25 tons of gravel delivered and it took two days to spread this at the front of the house. To top the house off we commissioned a weathervane of two flying ducks and installed this on one of the chimney pots.
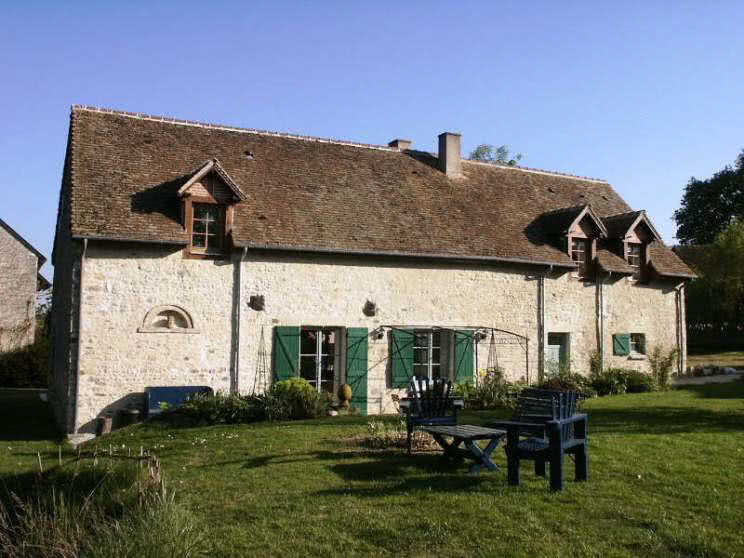
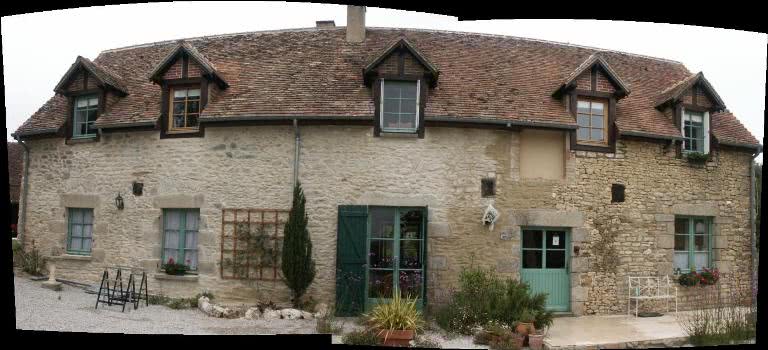
The outside appearance of the house had by now changed considerably, but is entirely in keeping with the original farmhouse character.
The weathervane has since beeen relocated to one of the gable ends, as it fell off in an extraordinary gale, taking a lump of concrete and part of the roof with it as it crashed to the ground in front of the French windows.
Here is the house front, before and after the conversion work (2005):

Here is the house rear, before and after:

2. Rejointing stonework - the DIY method
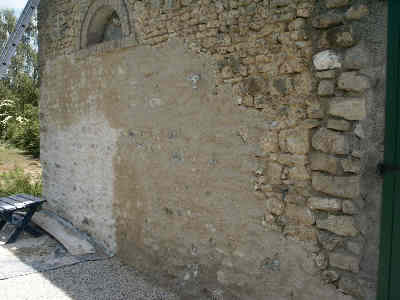
We had a 4 year plan to rejoint/repoint all of the exterior stonework in lime mortar - most of the old mortar had reached the end of its life or was totally missing in many places, as well as being patched by inappropriate cement mortar. In early summer 2006 we started on the rear wall - it took 3 weeks to rake out and 4 weeks to refill an area of about 20m wide by 5m high.
First job was to rake out the old mortar using a combination of pick and percussion hammer - for this a home-made lightweight 'pick' was easier to use and easier on the arm than a mason's hammer. The pick was made from a piece of 1cm solid iron bar, gently curved and about 30cm long with a point ground onto on each end. In the middle was welded a tubular metal handle. With our crumbly old mortar it was possible to rake out about 2m2 per hour, sometimes using the pick alone. For harder mortar an electric percussion hammer was necessary, but it was very heavy to use above shoulder height.

The technique: start at one end and work down the wall from the top doing 1-2 metre width at a time. Rake out to a depth of about 2cm - you don't have to get all the old mortar out. Don't worry about stones moving or the odd one falling out, it's normal. Put down a heavy tarpaulin to catch the muck. Keep doors and windows and shutters closed! A scaffold tower was used to reach the areas above shoulder height and working up a ladder was necessary for the gable end apex (8m up) but was hard on the feet!

Afterwards pressure wash or hose the wall from top to bottom to remove any remaining loose stuff. Angle the nozzle down the wall, not into the cracks, or you'll wash out a load of the interior wall filling - often just soft sand and earth.
Mix mortar comprising approx. 100 litres coarse sand (sable de rivière) to 35kg lime (chaux blanche). Measurements on lime sacks are often given using this weird mixture of litres of sand and weight of lime. This mix translates to approx. 1 bucket of lime to 3 of sand. There is no fixed rule for how much water to add - it depends on how damp the sand is to start with. I added water to obtain a mix which stuck on the sides of the cement mixer until just over the apex then curved smoothly over to fall to the bottom of the "cuve". If you pick out a bit and toss it from hand to hand, it should form a loose ball and keep its shape, but still be easy to form and to squeeze into crevices. NOT TOO DRY or it is awful to get into gaps, especially once it starts to go off.
According to the real experts - the CAUE office architects - you should only use chaux with stone - a cement mortar mix when used on any stone can lead to problems as it is too strong (has less 'give' and more grip) and also prevents the wall from properly expelling moisture - a real problem on some old agricultural buildings and farmhouses made with stone and earth infill. Lime mortar gives and then self heals when the wall moves slightly; cement mortar is rigid, either the mortar cracks or the mortar cracks the stones.
If the wall is in a very exposed position I was told by a neighbour to add "impermeabilisant" during mixing - but again, this can reduce the ability of the wall to breathe and is not recommended by the CAUE.
At time of writing, sand is cheapest bought direct from a quarry - about half the price of loose sand from the "grands surfaces", PointP, Gedimat, Brico Depot and the like. We paid 19 euros a ton TTC plus 35 euros delivery (2005). The colour of the sand will determine the hue of the finished wall. You can also add colourants if you're trying to match another section of render or pointing, but it may take some experimentation to get the right colour match. We were happy to go with the natural colour and let it weather in time.
Do not mix more lime mortar than you will be able to use before the mix goes 'off' and becomes unworkable. A wheelbarrowful (circa 10 litres chaux, 30 litres sand) is enough. This mix will easily keep for about 2-3 hours, and you can add a little more water to loosen it if it starts going off. A barrowful, covering about 2.0sq metres (though actual coverage depends on the gaps in the stones) can be applied in about 3 hours. Cover the barrow with a plastic sheet to keep the mix moist.
Thoroughly dampen the wall with a hose before you apply the new mortar and keep the wall damp as you work - this is important to stop the stone sucking all the moisture out of the mortar as soon as you apply it. The mason's manual technique is to sling the mortar onto the wall using a backhand flicking action with a medium sized triangular trowel; the mechanical method uses a pump and nozzle. When I flicked the mortar I ended up with 90% on the ground rather than the wall. So I tried putting a hawk (a square piece of wood or plastic with a handle underneath in the centre, for carrying small quantities of mortar to the work surface) up against the wall and pushing the mortar into the joints with my trowel. This was less wasteful but still took a long time to get anywhere.
So here is my cheat's method of mortaring. Buy a pair of mason's gloves and pick the mortar up in your hands, toss it hand to hand to make a ball, then throw/slap it into the gaps and push it well in. This is not as daft as it sounds. Your neighbours may laugh if they see you but it works and I found it's a lot quicker for a DIY-er.
I found it best to apply mortar early morning to midday, working from top to bottom of the wall in approx 2-metre wide sections. Start at the top because it stops the work staining when you apply more water to the wall. During the afternoon come back and check the wall occasionally - once the lime mortar starts to look white-ish in parts and you can rub without it clogging a brass wire brush, you are ready to clean off the excess mortar. Don't leave it to set completely or you can't brush it off! Drying time will depend on ambient tremperature and humidity - when later working in an enclosed, cool area I found I actually had to leave it overnight. Work over the mortar from the driest (usually topmost) section, rubbing off until you get the degree of stone exposure required. Don't use a steel bristle brush if you can avoid it - they wear out quicker and are a bit too aggressive. Best is a brass brush that curves as it avoids scraping your knuckles. I also found a stiff nylon scrubbing brush useful for this job.

The initial result looked rather white but this was mainly due to dust - once hosed down, and after a little weathering, it soon took on a softer hue. The finished result is shown below, shortly after completion in 2006. There is not a lot of stone left exposed on the rear of the house because (1) it is north-west facing and (2) the stones are a mixture of sizes and colours and unevenly distributed, so do not look too decorative if exposed.
IN SOME AREAS -INCLUDING OURS - HARDLY ANY STONE IS LEFT EXPOSED AND THERE IS A REASON FOR THIS: IF TOO MUCH STONE IS EXPOSED IT WEATHERS MORE QUICKLY IN FROST ETC., PARTICULARLY IF THE LOCAL STONE IS SOFT AND/OR POROUS.
Having completed the rear of the house in 2006, we waited until 2007 before starting on the front.
2007 - repointing the front of the house with lime mortar
Here are some pictures taken of the front of the house in 2007 as work progressed. The hacking out took one week and the repointing 12 days (over the course of a month). Because the stones are more attractive and there is less weathering on this side than at the rear, we left more of them exposed.
Hacking Out Stage 1

Hacking Out Stage 2

Repointing Day 1

Repointing Day 6
Repointing Day 12
2008 - rendering the gable end with lime mortar
In 2008 one of the gable end walls, the west facing wall, was cleaned off and rendered over. This wall was a real mess - all sorts of sizes of stone, some of really poor quality, extremely uneven with substantial lumps and bumps (some other buildings had once abutted it) and it looked like a pig-ugly patchwork.

Because of this we decided to render it over completely. The result is still a bit lumpy, and isn't as pretty as the rest of the house, but it gives good weather protection and is miles better than it was before!
Rendering the West Gable End Day 4

Rendering the West Gable End Day 7

Rendering the West Gable End Day 10

Rendering the West Gable End Day 14

After a couple of months, the wall took on an even hue and texture with no signs of joins between stages of work.
2009 - the east gable end wall - pointing with lime mortar
The final stage! Lime pointing the east gable end June - July 2009
.jpg)
.jpg)
.jpg)
3. Lake (Etang) Restoration
One of the attractions when we saw La Basse Cour in 2004 was that there was a small lake/large pond (an "étang" of about 2.5-3000m2) on the property, which could be seen from the kitchen window and which led to all kinds of romantic notions of gazing at water lilies, leaping fish, dragonflies buzzing over the surface etc. while doing the dishes.
Since the middle ages étangs have been created in this area by building a dyke wall (effectively a dam) in the path of a stream, thereby creating shallow reservoir for fishing or to provide drinking water for livestock. Sometimes smaller ones were made by simply excavating a hole around a spring or in a the path of a steam. They are not generally very deep - most are only a couple of metres deep at most - though there are exceptions locally where the étangs cover several hectares and are correspondingly deeper.
During the very hot and dry summer of 2004 the stream which fed the lake dried up; consequently, the lake itself began to dry out and by September it had become more of a mudflat; however, it refilled during the winter.
During 2005 the lake began to dry out again again. In fact, by the end of July - two months earlier than in 2004 - it was completely dry and all the fish had perished.

The reason for this was that there was so much silt in the bottom of the lake (between 1 - 1.8m) that the volume and depth of water (no more than 30cm) was insufficient to withstand summer droughts.
We decided we had to dredge the lake in order to secure its long term survival, otherwise within a few years it would become seasonal marshland. To do this we first had to find the plug, which was nowhere to be seen; even once located it took two days of digging in September 2005 to free this from the mud.


Unfortunately, pulling the plug had no effect - it appeared that the pipe which should have led from the drainage hole to the ditch which borders the adjoining field was blocked or broken. So in November 2005 we hired a JCB to dig a deep ditch to join the drainage hole to the ditch. Strangely, when we did this there was no sign of a pipe leading from the plughole to the ditch - perhaps no-one had bothered to lay one when the patch of ground between the lake and the drainage ditch was built up, as it clearly had been, judging from the rubble and rubbish that was dug up during the excavation.


After several false starts (three small landslides into the new ditch during December and January) we succeeded in draining the lake properly by April 2006.

It had dried out fully by early autumn 2006. The plan had been to spread the earth from the lake bed - first estimate about 2,000 tons - on the field next door, as the farmer had given us permission to do. Unfortunately, there was not sufficient time between the autumn harvest and the planting of the next crop for this to be accomplished in autumn 2006. So the "dry" lake had to be left another 12 months, until the early autumn of 2007, before actual dredging could begin. Meanwhile, during the course of spring and summer 2007 a small forest of willows grew up in the former lake bed.

The unusually wet early to mid summer of 2007 meant that the stream continued flowing all that year and the lower levels of the silt remained sodden throughout. However, from mid July the weather improved markedly, the sun shone, we had several weeks without significant rainfall. Once the harvest was completed and the adjoining field vacant, dredging work was finally able to begin on September 21, 2007. The first stage was to dig a wide trench across the lake bed to allow the silt to drain further for a couple of days.


On September 24th work began in earnest, involving a caterpillar digger and two tractor-drawn trailers to haul the earth. By the end of day one work had advanced this far (picture taken looking south).

Halfway through day two this first side of the lake was almost completely dug out (picture taken looking north).

In order to access the second side of the lake, the temporary drainage ditch (with a new drainage pipe installed to link the plughole to the permanent ditch) was filled in and an access ramp into the lake bed laid near the main house.

With the ramp in place work began on the side of the lake nearest the house. Again, some of the earth was used to terrace the banks and the rest was transported to the adjoining field. See Video above for the work in progress.
After four days the excavation was largely complete; at its deepest the étang is now approximately two metres deep. The terraces on the far (east) and near (west) sides have also been made wider, as mentioned.

With the earth moving complete, we fitted a wastegate in order to enable us to adjust the water level in future, if need be; the water level is adjusted by adding or removing planks from the wastegate. Inside the wastegate is the original plug, repaired.

After about 4 weeks the water level had risen approximately one metre.

and by the end of November it had risen to the desired level for over winter 2007-2008. This picture was taken mid-December 2007.

In spring 2008 we grassed the new banks and during the spring and early summer a variety of wild aquatic plants established themselves, some of which (reeds, water mint, sagittaria) have helped to stabilise the new terraces where they meet the water edge. Some cultivated plants have also been added in the corner nearest the house, including water lilies. During its first summer the renovated lake was alive with dragonflies, damsel flies and a myriad different water beetles. The frogs and toads returned, and moorhens and mallards took up residence, successfully breeding. Some perch have also been introduced from an étang further upstream and we have had visits from kingfishers.


In 2009 we rebuilt the main retaining wall - the exceptionally dry summer, when the level dropped 50cm, helped as it meant I could work on the wall in waders as long as I was careful not to stray too far from the edge!
